RaspberryPi[21] Ntrip Caster on Raspbian
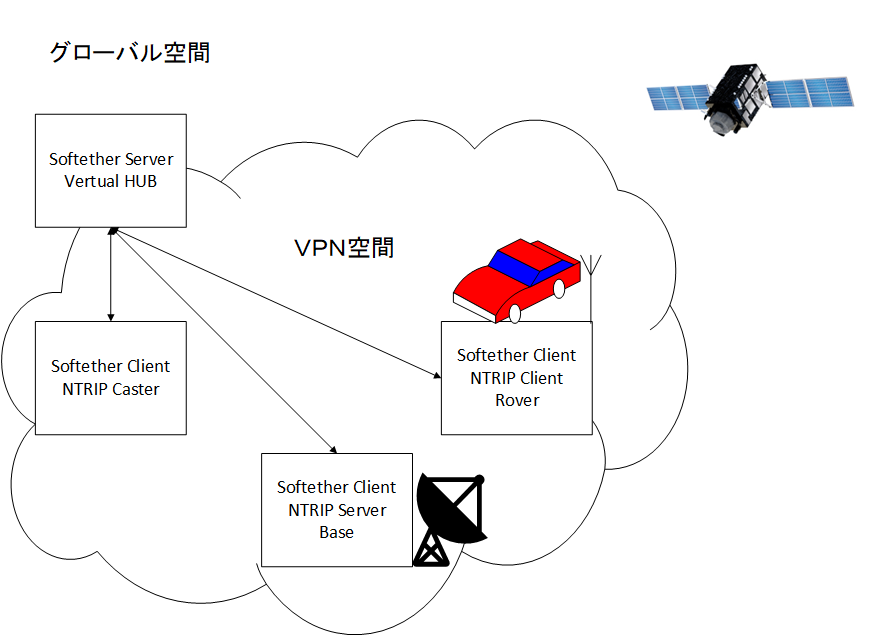
さくらネットのIPSサーバーにNtrip Casterを立てた話は過去ブログに書きました。殆ど、他の人におんぶされているだけですが。IPSサーバーはグローバルIPでCasterを運用することになります。セキュリティー上から公開したくないとの要望があり、softetherの仮想ネットワーク内にCasterを立てられないかなというのが今回の試みです。IPSではsoftetherのサーバーも動いているので、Casterで仮想HUBがアクセスできるのなら、簡単だと思いましたが、どうも、Linuxの都合上それはできないようです。https://cgbeginner.net/ubuntu-softether-vpn/ にそのことに触れているようです。ローカルブリッジを使えばできそうだなとは思いましたが、私では理解不能なので違う方法をとることにしました。
それは、仮想HUB内にもう一つ、Ntrip Casterを立てれば仮想空間で完結できるのではないかという事です。Ntrip CasterはLinuxようなので、Raspbianでも動くんじゃないかと淡い期待を持って始めました。
また、自分用のNTRIP caster をたてる を見ながらインストールをやっていると少し、「あれ?」と思うことがあったので、少し補足して書いてみます。
まず、インストール先のフォルダを作成します。
pi@raspberrypi:~ $ sudo mkdir /opt/ntripcasterBuildするフォルダに移動します。私はHOMEのしたにworkフォルダを作って作業しているので、以下のようにしました。
pi@raspberrypi:~ $ cd work
pi@raspberrypi:~/work $ pwd
/home/pi/work
その場所で、
pi@raspberrypi:~/work $ git clone https://github.com/baidu/ntripcaster.git
pi@raspberrypi:~/work $ cd ntripcaster
pi@raspberrypi:~/work $ ./configure  --prefix=/opt/ntripcaster
pi@raspberrypi:~/work $ make
pi@raspberrypi:~/work $ sudo make install
pi@raspberrypi:~/work $ ls -al  /opt/ntripcaster
合計 20
drwxr-xr-x 5 root root 4096  3月 26 13:55 .
drwxr-xr-x 5 root root 4096  3月 26 13:53 ..
drwxr-xr-x 2 root root 4096  3月 26 13:55 bin
drwxr-xr-x 2 root root 4096  3月 26 13:55 conf
drwxr-xr-x 2 root root 4096  3月 26 13:55 logs
と、/opt/ntripcaster 配下にインストールが完了しました。conf にあるsourcetable.dat.dist と ntripcaster.conf.dis をコピーして編集します。
pi@raspberrypi:/opt/ntripcaster/conf $ sudo cp sourcetable.dat.dist sourcetable.dat
pi@raspberrypi:/opt/ntripcaster/conf $ sudo cp ntripcaster.conf.dist ntripcaster.conf
##################################
# NtripCaster configuration file #
################################################################################

############### Server Location and Resposible Person ##########################
# Server meta info with no fuctionality.

location XXX
rp_email xxx@xxx.jp
server_url http://www.xxxx.jp

########################### Server Limits ######################################
# Maximum number of simultaneous connections.

max_clients 100
max_clients_per_source 100
max_sources 40

######################### Server passwords #####################################
# The "encoder_password" is used from the sources to log in.

encoder_password passwor

#################### Server IP/port configuration ##############################
# The server_name specifies the hostname of the server and must not be set to
# an IP-adress. It is very important that server_name resolves to the IP-adress
# the server is running at.
# For every port, the server should listen to, a new port line can be added.

#VPN local IP
server_name 192.168.xxx.xxx
# port 80
#80 だと既に動いているサービスとかち合うので使わないほうが楽
port 2101

######################## Main Server Logfile ##################################
# logfile contains information about connections, warnings, errors etc.

logdir /opt/ntripcaster/logs
logfile ntripcaster.log

############################ Access Control ###################################
# Here you specify which users have access to which mountpoints,
# one line per mount.
#
# Syntax: /<MOUNTPOINT>:<USER1>:<PASSWORD1>,<USER2>:<PASSWORD2>,...,<USERn>:<PASSWORDn>
#
# /<MOUNTPOINT>: name of the mountpoint. Must start with a slash.
# <USERi>: name of the user that has access to <MOUNTPOINT>.
# <PASSWORDi>: password of <USERi>.
#

# example:
/AAAA:aaaaa:password
/BBBB:bbbbb:password
#/mount0:user0:pass0,user1:pass1,user2:pass2
#/BUCU0:user1:password1,user2:password2
#/PADO0
#sourcetable.dat
STR;AAAA;AAAA;RTCM3.0;.....;2;GPS+GLONASS+Galileo;;JPN;35.XXXXXXXXX;139.XXXXXXXXX;0;0;u-bloxZED-F9P;none;N;N;1152500;Temporary
STR;BBB;BBB;RTCM3.0;.....;2;GPS+GLONASS+Galileo;;JPN;35.XXXXXXXXX;139.XXXXXXXXX;0;0;VFAN UG-353;none;N;N;9600;Testing
起動は以下を実行します。
pi@raspberrypi:/opt/ntripcaster/bin $ /opt/ntripcaster/bin/ntripcaster動作確認方法
windows版のRTKLIBをダウンロードします。https://github.com/tomojitakasu/RTKLIB_bin/tree/rtklib_2.4.3
サイトに行って右上の Code を選択して、Dowload ZIP でダウンロードできます。解凍して bin フォルダにある strsvr.exe を起動します。
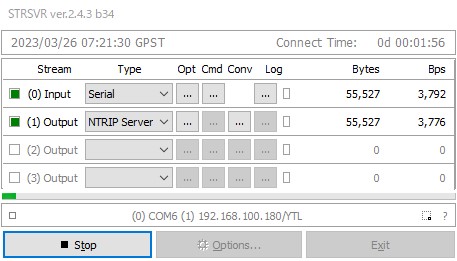
InputはOptの下の ・・・ をクリックしてPCに刺したUSB GPSのポートと BaudRateなどを書きます。
Outputは CasterのIPアドレス、Port番号、Mountpoint名、パスワードを入れます。Mount Optionは入れなくても動きました。多分、入れたほうがいいと思います。
そして、Start を押して、Input Output共に緑変われば正しく動いているようです。